Creating a Video Record
Uploading your video to Media Manager
We previously used Media Manager 2 to store our videos, but we've now created an updated platform in Media Manager 3 (MM3). You need to add your video to MM3 and grab the MM3 ID before you can create a video record in one of our platforms (Titan/Hydra/Insure TV).
Add your video to the correct region!
Make sure to add your video to the appropriate team on MM3 that corresponds the region you want to create your video in (UK, US, South Africa, Insure TV, etc).
You can find a more comprehensive guide to adding videos to MM3 in this guide: Uploading Videos.
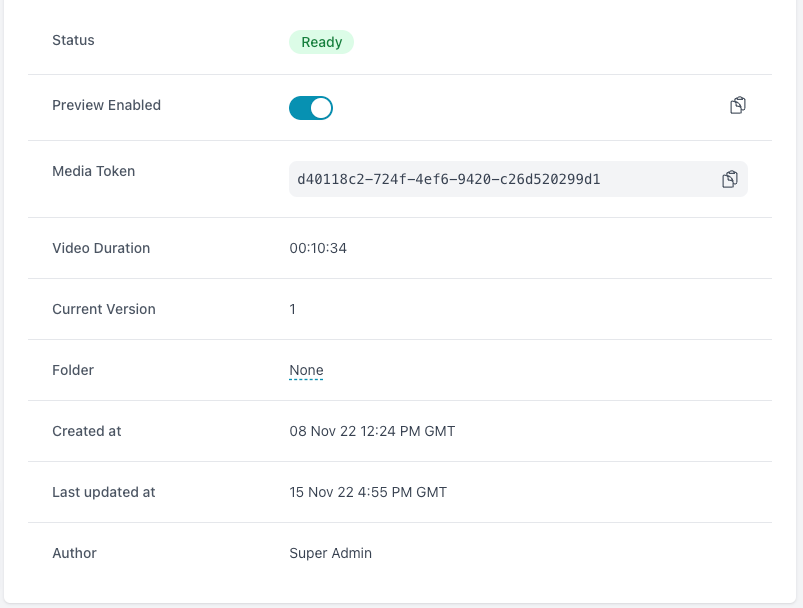
To grab the MM3 ID you need to edit your video and grab the Media Token.
Creating your Video Record
The Primary Details tab
- Access the "Create Video" form. There are a number of ways to do this. Either from the
content menu on the admin bar(accessible from all admin pages), from theadmin dashboardpage or from theAll Contentpage. - The form can be completed very easily if you’re Media Manager record is up to date. To do this select
Media Manager 3from theSelect Playerdropdown menu. - You can then enter the unique
Media Tokencopied from MM3 and press theCopy Databutton. This will copy over all the data from the MM3 entry. - It will then prompt you on whether you would "like to copy data from Media Manager".
- The thumbnail of the video found in Media Manager will appear in the top right giving you an indication you’ve selected the correct video.
- Providing the details have been completed you can select okay and the title, description and duration fields will be automatically filled in for you. They can be edited afterwards where necessary.
- You will need to select a "Primary Channel*" from the dropdown. As a default this would be the client featured in the video. There are additional channels for Masterclasses, Conferences etc. which can be used instead. This will use that channels branding on the video playback page.
- The duration at the bottom will autofill if you import details from Media Manager. If this is entered manually, i.e. for a YouTube video, then this should be done in hours:minutes:seconds (HH:MM:SS).
Using Third Party Video Players
When selecting the player from the drop-down you’ll see more choices than just Media Manager 3.
To feature a YouTube, Bloomberg, etc. video on Asset TV you can select the relevant video service and using a reference from their embed code to do so. Below is a guide to which codes to look for.
YouTube
To access the embed code for a YouTube video you can click the "Share" icon under the video and selecting the "Embed" tab. This will allow you to copy and paste a code like the below:
<iframe width="560" height="315" src="https://www.youtube.com/embed/AirytDLGbbQ" frameborder="0" allowfullscreen></iframe>
To feature the above video on Asset TV we just need to use the part of the code I’ve highlighted in red as our video ID. To make it easier to access this section of code you can simply take it from the YouTube URL – i.e. for this video https://www.youtube.com/watch?v=AirytDLGbbQ.
Bloomberg
To access the embed code for Bloomberg videos you need to select the Share icon on the Bloomberg player, this is an arrow icon in the bottom right of the player next to the closed caption ‘CC’ icon and the full screen toggle. Similar to YouTube this will allow you to copy and paste an embed code:
<iframe src="https://www.bloomberg.com/politics/api/embed/iframe?id=c89764ef-a1c3-4be3-88e3-21dbdf1d6a55" allowscriptaccess="always" frameborder="0"></iframe>
As with the YouTube player we only need Bloomberg’s ID for the video – highlighted in red below – which we can then use for the "Video ID" on our Titan record.
https://www.bloomberg.com/politics/api/embed/iframe?id=c89764ef-a1c3-4be3-88e3-21dbdf1d6a55
HTML
If you need to use a video embed from a different platform other than MM3, YouTube, or Bloomberg you can use the HTML player. This will allow you to use any provided video embed code
An important note about duration
It is important that the duration is accurate when the video goes live as this is used to calculate the engagement figures for the clients’ MI. An incorrect duration will result in inaccurate engagement figures – i.e. if an initial edit was a 10-minute video but was edited down to 2m30s by the time of publication, and we don’t update the duration, then even if every viewer watched all 2m30s their engagement figure would only show a total of 25%!!
If you import the media details from your completed Media Manager record the duration field will be updated in line with the length of the version being accessed at that time (most likely when you first create the record).
PLEASE BE AWARE THAT THIS WILL NOT AUTOMATICALLY UPDATE!
If you upload a new version with edits and this changes the duration you will need to update the duration field in your Titan record. If you’re posting a video from Bloomberg or YouTube this will need to be added manually from the outset.
Video Info Tab
- Under the video Info tab you can add the image you would like to be used as the thumbnail on your site. The Media Manager thumbnail will be set when you import the data from there, but you can manually change/update it here. The form provides instructions on the file types and sizes allowed for this.
- The recorded date is not essential but is a good way to track how long a video was in the editing and sign off process should you wish to monitor that for any reason. It can also be a useful tool to find a video further down the line as you may not know the date it was published to the site, but can remember the date it was filmed.
- Transcripts should be copied and pasted into the text box. This will then allow viewers to have the transcript display under the player on the Asset.tv site. N.B. if clients would prefer to have a branded transcript appear alongside their media this will need to be added as a PDF on the "Downloads & Links" tab. Please note that this will not appear below the player.
- If ticked, the "structured" option will mark the video as qualifying for CPD on a viewer’s viewing record. This is extremely important - if this is not ticked for qualifying videos then viewers will not be able to claim the structured CPD points from their awarding bodies!
- The CORE video ID will automatically generate and whilst it can be edited this should only be in exceptional circumstances.
- By ticking "Hide Contact Me" your video won’t feature the Contact Me form.
Contact Info Tab
- Select Info Type allows you to choose where the contact information you would like shown alongside the video comes from. There are two options available (other than ‘none’), Custom or Company.
- Selecting "Custom" will allow you to create a contact information box unique to the video. Selecting "Company" will pull through the contact details for the company specified in the "Contact Info Company" dropdown at the bottom of this tab (N.B. These contact details will need to be added to the Company Term to be pulled through).
- The text field for the Contact Details should be completed where "Custom" has been selected. This allows you to enter either plain text, or HTML should you wish to utilize images and links. N.B. the field uses "Filtered HTML" meaning you don’t have to write full HTML. For example website addresses and email address that appear in the text will become links automatically. Also line breaks and paragraphs will be also be retained without HTML tags.
- The Contact Info Company dropdown will assign the Contact Info saved to that company record (entered the same way as here – see blue box on previous page) assuming you’ve selected "Company" under the "Select Info Type" dropdown at the top of this tab. This will save time for those clients who don’t alter their contact information from video to video
Adding Contact Details to a Company
So your video can pull through your clients’ standard contact information using the "Company" option you will need to ensure the Company term has these details.
To do this you can access the list of terms from the dashboard or from the main Admin menu bar Structure > Taxonomy.
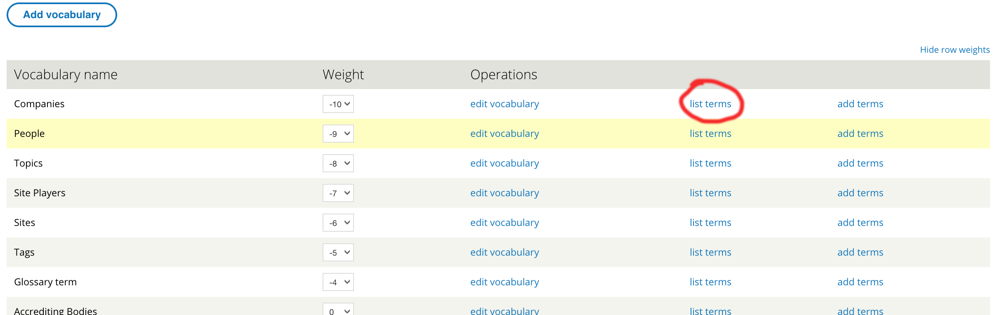
Selecting "List terms" will present you with a list of the companies.
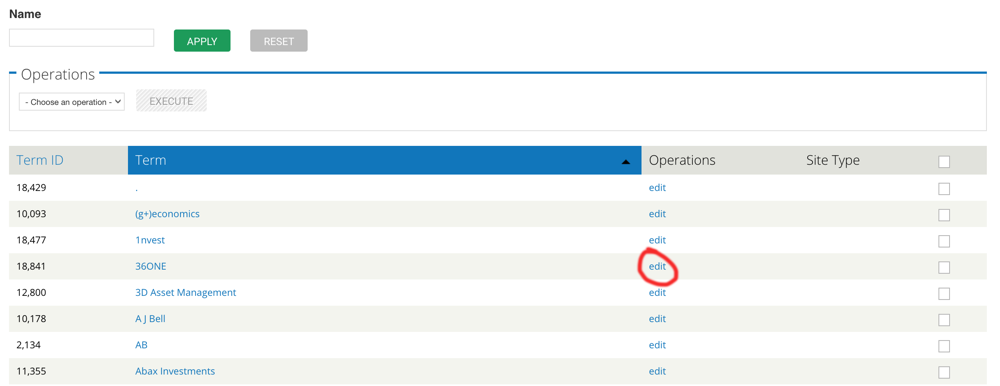
When you select edit you will need to add your Contact Info HTML to the Description box. Once this has been added ensure the "Text format" dropdown is set to "Full HTML" and select save. Now when you select the company under the video form’s Contact Info tab this HTML will be shown.
Setting Different Contact Details by Region
If your client wants different contact information showing for different regions, you can do this via the HTML you enter. This will apply to both the HTML you apply to the company term and the Custom option.
When you enter your HTML you simply need to ‘wrap’ the content for different regions in a specific class. Below are templates you can use to do this:
For Titan
<div class='hidden visible-uk'>
    <!--PLACE YOUR UK CONTACT HTML HERE-->
</div>

<div class='hidden visible-asia'>
    <!--PLACE YOUR ASIA CONTACT HTML HERE-->
</div>

<div class='hidden visible-europe'>
    <!--PLACE YOUR ASIA CONTACT HTML HERE-->
</div>
For Hydra
<div class='hidden visible-us'>
    <!--PLACE YOUR US CONTACT HTML HERE-->
</div>

<div class='hidden visible-canada'>
    <!--PLACE YOUR CANADA CONTACT HTML HERE-->
</div>
Vocabularies Tab
- The vocabulary fields help point your video to appropriate channel pages, and help your viewers find the video via searches on the site.
- The Companies tab will place the video onto the video channel page of the company you add. This allows programmes such as Masterclass to be featured on participants’ company pages as well as the Masterclass channel you’d selected under Primary Channel on the Primary Details tab.
- The people tag is unlikely to add your media to channel pages but will allow viewers to locate particular speakers if that’s what they’re looking for, or filter any other search results by the speaker names.
- N.B. Whilst it is unlikely to add media to particular channel pages this isn’t necessarily impossible. When setting up channel pages these fields are repeated so technically you could create channel pages for particular speakers, asset classes or tags as well as companies.
- All fields will accept multiple terms, they simply need to be separated by a comma.
Site Player Tab
This tab will let you add the media to a standalone player.
- Start typing the
name of your player(normally the client name) and this will autofill with players that match that title. - Once selected you can then set
start and end datesfor the player. The start date will default to today’s date. If you do not wish to set an expiration date for the stand-alone player hosting you simply need to clear the Date and Time boxes. - To set an
expiration date(standard players include only 12 months hosting) you simply need to enter the dates in the format shown. - Tick the
Active box. - To add additional players click add another item and repeat as above.
Analytics Tab
There is only one field to enter here which is the "Owner". This has not been listed with the Vocabulary terms as it does not show on the main website, and doesn’t affect where it would sit on the site.
The Owner term is to list any and all companies that you would like to the video to appear on for analytics reports. As with the Vocabularies multiple companies can be entered here and will simply need to be separated by a comma.
Channel Page Tab
There is one setting on this tab called Scoped to Channel.
This setting makes it so the video will only show on the videos' Primary Channel.
Menu Settings Tab
- By ticking the "Provide a menu link" you will be able to add a direct link to your video to a menu on the site. Once ticked several other fields will appear.
- The Menu Link titles allows you to set the text users will see when accessing your link from the menu where it will appear.
- The Weight drop down field lets you set the importance of your menu item. The lower the number the further up the menu your link will appear. Likewise by increasing the Weight number you can move your link further down the menu.
- Menu Link Attributes provide some more advanced features for your link. The Title field here won’t be what’s displayed in the menu but instead appears as a little box of text when a user hoovers over the link. This allows you to provide the user with a bit more of an explanation of where the link goes.
- The other options in the Menu Link Attributes section, and in the Menu Item Attributes allow you to create HTML or CSS classes around your links which can then be used for styling.
- If you are not sure of what these items are from the labelling or how you would go on to utilise them and affect the styling, then it is recommendable that you do not enter anything in those fields.
XML Sitemap Tab
Warning
This relates to how the video page is read by search engines. You should not edit these settings unless you're absolutely sure of what it will do.
Meta tags Tab
Warning
This relates to how the video page is read by search engines. You should not edit these settings unless you're absolutely sure of what it will do.
URL Redirects Tab
Changing a video’s title will in turn update the video’s URL which has been problematic in the past if the original URL has already been issued to clients. Titan will now automatically add the URL from the old title as a redirect.
For example, a video called "How to create a video record – test video" gives us a URL of http://www.assettv.com/video/how-create-video-record-test-video.
If we need to update that title to "Creating a video record – movie trailer example" the URL in turn is updated to http://www.assettv.com/video/creating-video-record-movie-trailer-example.
The URL Redirect tool will automatically redirect anyone accessing our old, original link to the updated one that uses our new title. This means there will be no issues for you or any clients who’ve used the original link for in a promotional e-mail for example.
We can also add our own custom redirects too by following the information in the Setting up Redirects guide.
Authoring Information Tab
This tab allows you to see and change who first created the content (changing the author may be applicable to blog posts where the author is featured on the site) and the "Authored on" date.
- The Authored on date will default to the date the record was created but should be updated when publishing to the site as this date will be used by the site when organising media and other content by date.
- As most lists default to organising by this date updating when publishing to the site allows you to ensure that it is made visible on the homepage or top of appropriate channel pages – or vice versa (i.e. setting a date in the past will position the video with other content also/originally published around that date).
Publishing Options Tab
| Item | Description |
|---|---|
| Published | To makes your media available on your site, ensure this box is checked. Likewise, to remove the content untick this box. |
| Promoted to the front page | Will feature your media on the homepage when checked. If unchecked your media won’t appear on the homepage but will still appear on the relevant video channel and in search results. |
| Sticky at the top of lists | This is currently an inactive option. |
| Hide from search | Removes the video from the site’s search tool meaning it won’t appear for viewers even if they search for the exact title or with any of the tags that have been applied. It will still appear on the Latest and relevant Channel pages. |
| Private Video | Should be used for content still in the sign off process. This will keep the video from Channel pages and the Latest page. It means the video is only accessible via a direct link. |
| Archive | This will allow you to enter the date the content was unpublished from all players. |
| Hide from Analytics (Sign Off) | This should be used in conjunction with Private Video to prevent stats being thrown off by those views that were made for sign off purposes only. PLEASE ENSURE YOU UNTICK THIS WHEN SETTING THE MEDIA LIVE AS WE CANNOT RETRIEVE VIEWS GAINED WHEN THIS IS SELECTED! |
Archiving Videos
When a video has come to the end of its shelf life, or if a client’s needs it to be removed from the site then we should archive as below – this will remove the video from Asset TV websites and players.
- Click into the edit section of the video you wish to remove.
- Under the "Site Players" tab ensure all players have "Active" un-ticked (not highlighted in green) – you do not need to remove the players
- Then under the "Publishing options" tab un-tick "
Published", "Promoted to front page" and select "Hide from Search" and "Archive". - When you click Archive a field will appear asking you to input the date – this will allow us to keep a record of when the video was archived further down the line.