Creating Quizzes on Titan
Introduction
Quizzes on Asset TV have been designed with Akademia in mind. As a result they will appear on the users CPD profile as a measure of time rather than score. How the measure of time is added is covered in the guide below.
Quizzes on South Africa function slightly differently to those on Akademia, UK, US. For South Africa they are used to Verify a video the user has watched. Also only for South Africa, point values get added for the CPD they are accredited for, this allows you to add a point value in addition to duration earned. The points only appear on the downloadble statements for South Africa users.
Setting up a quiz
To start setting up a quiz you need to select 'Quizzes > Add a Quiz' from the black admin bar in Titan.
A blank quiz form will load with some elements already present:
| Field | Description |
|---|---|
| Form Title | This would be the title of the quiz as it appears in the admin lists. It will be shown on the quiz itself by default. Clicking the Eye Icon will hide it from quiz pages. The Page & Pen Icon will allow you to edit the text. |
| Page Title | Quizzes can be presented over multiple ‘pages’ and this field would allow us to give each one a unique title if desired/applicable. As with the Form Title this can be hidden using the Eye Icon. The Page & Pen Icon will allow you to edit the text. |
| Text Field | A text field will load initially. This is simply for text to be presented to the person taking the quiz. To edit the text, click the cog icon (further details on editing below). You may wish to utilise it to add an explanation for the quiz or how the CPD works. If there is no use for it you can remove it by clicking the Trash Can Icon. |
| Required Text Field | This creates a mandatory text field. This could be used as a question within the quiz (if the user is expected to type a reply) or could be used to obtain information from the user that may not already be listed on their Asset TV profile. The answer would be presented with the quiz submission. |
Quiz basics – Settings & Pages
To start setting up your quiz you will first need to set up the ‘basic’ information for the quiz.
Under the settings drop down there are a number of fields to be set that would be reflected across the whole quiz, regardless of question types, pages etc.
- Submit button label - The 'Submit' label is for the button that appears on the final page of the quiz, so the user can send their results to be added to their CPD profile. It defaults to
Submitbut you may have an alternative you would like to use. - Next button label - The 'Next' label is simply how the button taking users to the next page of the quiz is labelled. It defaults to
Nextbut you may have an alternative likeContinueyou wish to change this to. - Submission Callback URL - Relates to where a user’s submission is sent to be processed/checked. This will be defaulted and should not be altered unless you know the reasoning for using an alternative URL
Warning
An incorrect URL would cause users quiz submissions to be lost so this should not be edited.
- Submission Successful Feedback - Relates to the message shown to a user when they have successfully submitted their quiz. You may wish to edit this to relate what the user should expect next in terms of their CPD profile eg. "
Quiz submitted successfully, please allow 24 hours for your CPD profile to update". - Submission Failed Feedback - Relates to the message shown to a user when they have successfully submitted their quiz. You may wish to edit this to give more information on their failure or perhaps a link to contact support if the submission fails eg. "
There was a problem submitting your quiz please try again or contact support@asset.tv". - Quiz check box - Should be ticked if you wish for the user to be awarded marks for correct answers. An additional field will appear allowing you to set a minimum score required to be awarded a pass.
- Pages dropdown - Allows you to add additional pages to your quiz. Gives control of the space the quiz takes on the page you place it on. Ten questions on one page would lead to the user scrolling down excessively – by splitting the ten questions over a few pages we can side step issues with the look of the quiz once a user was expected to scroll all the way down past the other elements of the Asset TV site page it appeared on.
Tip
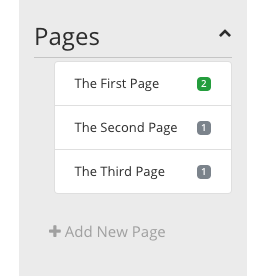 When you have pages in place the Pages dropdown is a good place to click instantly between the set-up pages.
It also works as a reference showing how many ‘components’ (questions) have been added to each page.
This information appears in the grey box next to each page name (the green box indicates which page is being displayed in the edit area).
Pages can be added as you go, so you don’t won't these to be added before constructing the quiz.
Setting up a quiz – Components
Now we’ve covered the basics and set up our Quiz settings we can start adding 'Components'. Below is an explanation for each of the available components that you can use to construct your quiz:
Text
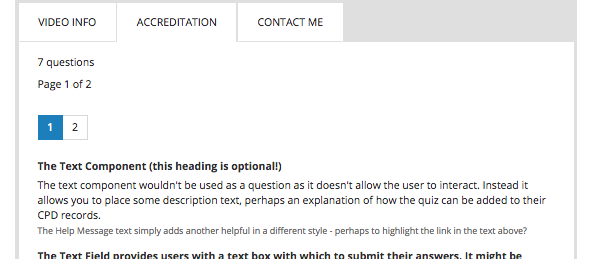
The text element is simply a way to place some descriptive text into your quiz. It doesn’t require interactions from the user so doesn’t allow you to add points or right and wrong answers. Complete the form as below.
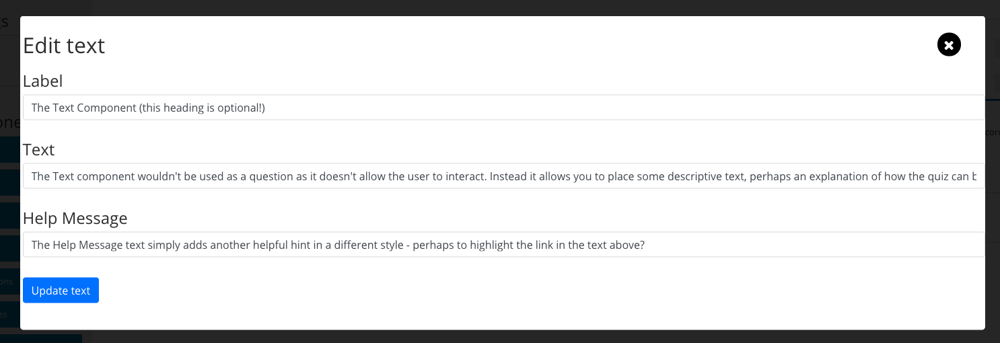
To achieve this output.
 |
|
Text Field & Text Area
These components insert a text box for users to complete - the difference between the two being the size of the text box presented to users. To complete the form you need to add your question under Label.
You can then add placeholder text and a help message if you wish (these are not required so can be left blank).
As this component can be interacted with by users there are further settings you can adjust.
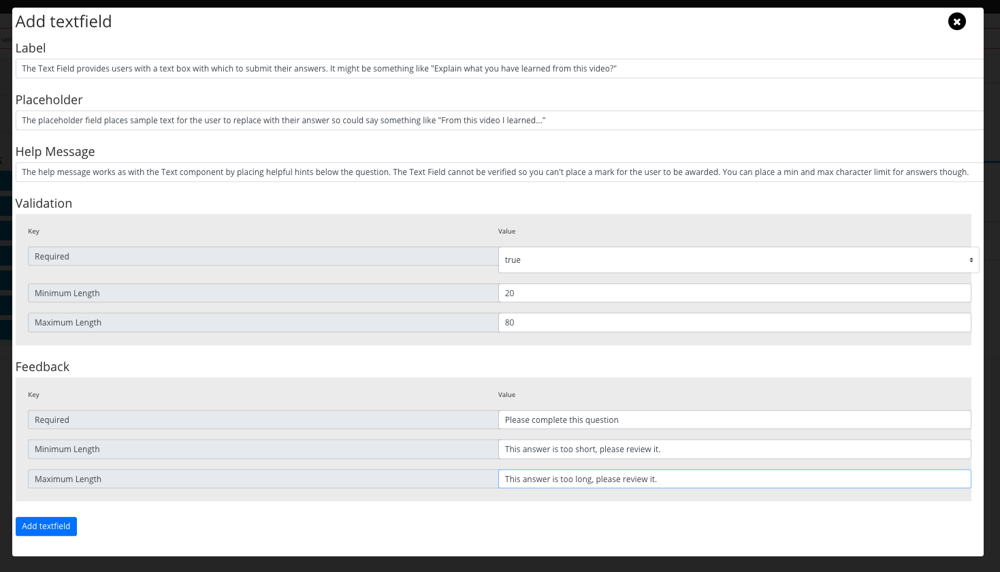
Under Validation you can set the question as 'Mandatory' for users to complete by changing Required to true. This will prompt users to complete the question before allowing them to continue to another page or submitting the quiz. Validation also lets you insert parameters for answers if you wish. You can set a minimum and maximum character limit that users would need to meet before the field is considered complete.
The Feedback section of the form allows you to set what the user sees upon completing certain interactions.
Required allows you to set the message a user would see if they attempt to continue or submit the quiz without completing this section.
Minimum Length and Maximum Length allow you to edit the message the user sees if they have not met / have exceeded your character limitations.
Select
The select component is a drop-down list of potential answers. The user would need to select from the answers given here.
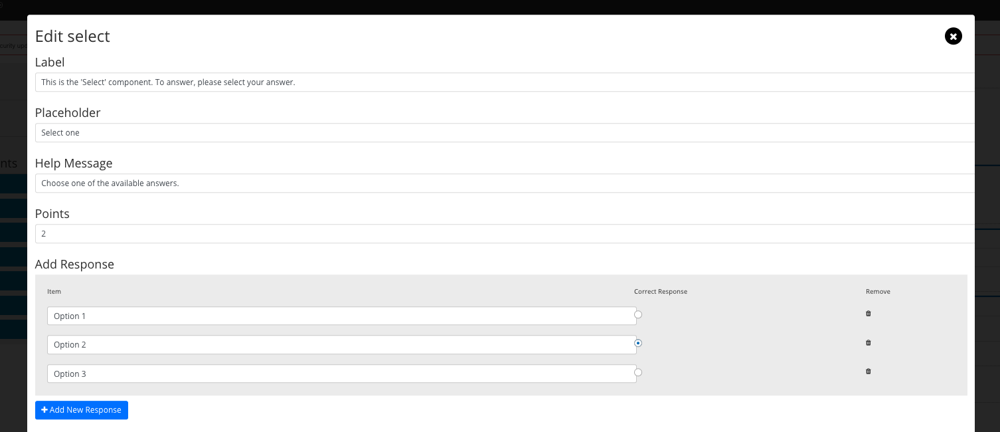
- The Label is the question itself.
- The Placeholder text appears on your drop down list until a selection is made.
- The Help Message works as a hint for what to do with this question.
Info
Unlike the Text Field or Text Area this question can be verified by the system and so we can award points for it. If you have not ticked Quiz under settings (see above) then you will not see the option to award a score.
- + Add New Response creates a field for you to add your answer and the alternative choices to be presented to a user. Assuming you have ticked
Quizunder settings you will see a tick box to mark one of the answers as correct. You can only select one answer on this component. - The Validation area of this component works similar to the text options. You can set the question as mandatory or not by setting Required to
TrueorFalse. - You can also set whether or not the quiz would give Instant Feedback based on the user’s input. True would mean a user is told the answer is right or wrong once they’ve made their choice. The Feedback area allows you to set the messages for when the question has been answered correctly, incorrectly or a message instructing them to complete the mandatory question before proceeding.
Radio Buttons
The radio buttons component is likely to be the most used question type. It is best described as 'the multiple choice' question.
Unlike previous components there is no placeholder text, just a label (for the question) and the help message area.
The remainder of the form for Radio Buttons is as with the Select component:
- Set marks to be awarded for correct answers.
- Add Response options and set one as correct
- Set it so the question is required or not and whether to show users feedback based on their answer
- Set the messages to be show for wrong, right and not completed questions
Check Boxes
Check Boxes are almost identical to the Radio Button components with the additional option to allow users to select more than one answer.
The setup is the same in that you set the question, points, options and feedback text. The only difference here is that you can select more than one answer to be correct.
Tip
The feedback text will show the incorrect message until all correct answers are selected.
Linking your quiz to a video
Once the quiz has been created we can then link to a video (or multiple videos if relevant).
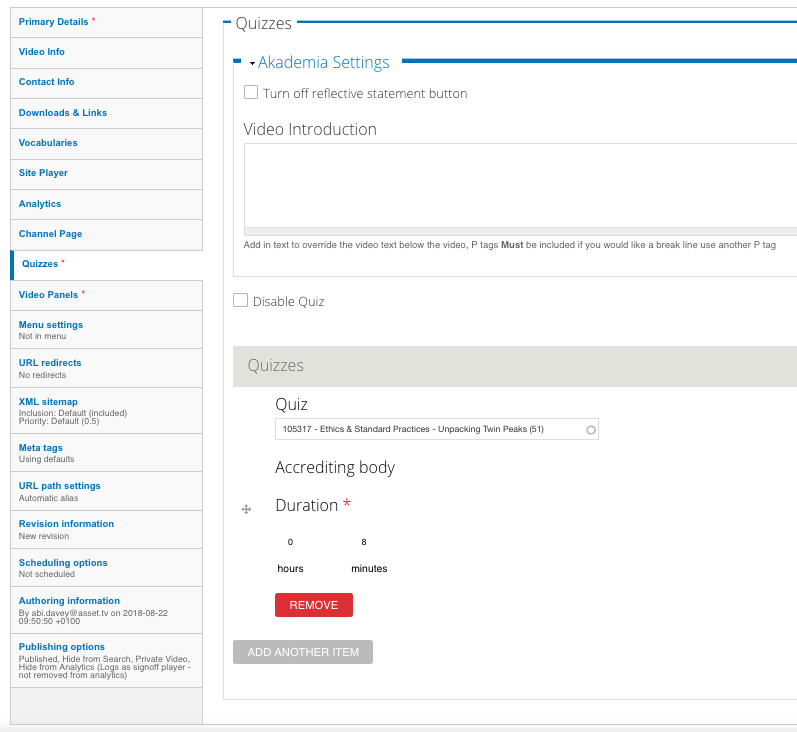
To do this we edit the video form and select the Quiz tab:
Akademia Only
At the top of the form there is an option related to the Akademia site. Clicking this will hide the red 'Add a Reflective Statement' button that appears under players. We can then replace the default text that talks about adding the reflective statement by adding new text to the 'Video Introduction' field. If you leave that field blank it will keep the default text in place and just remove the red button.
- The Disable Quiz option will hide the quiz from stand alone players.
- To link a quiz we can start typing our quiz title into the Quiz field. This will autocomplete based on the quizzes set up in the system.
- The duration field below this equates to how much time a user will have applied to their CPD profiles when completed. As a general rule you should look to add 1 min per question but this should always be double checked with the quiz providers or the editorial team.
- The Points field is for South Africa and rewards those points to the user upon successful completion and submission of the quiz.
- Once
linkedwe can save the video and the quiz will be added under the player screen on the video page.
Downloading Quiz Submissions
- To access quiz submission select
Quizzes > Resultsfrom the black admin bar. - This will present you with a list of all completed quizzes.
- Once we have set date filters as we require them we can then select the lines we wish to export to a CSV of results. You can select all entries by clicking the check box at the top of the first column.