Creating Virtual AGM Events
Introductions
The Virtual AGM allows shareholders and boards to come together on a secure online platform to execute the company’s business, ask questions, vote and participate, without the need to travel to a public meeting.
Instructions
Note
Please note, the below guide mainly references Asset TV platforms, but the process is identical for Insure TV events too.
Creating the registration form
This will allow a user to log in to the event using a predetermined Meeting ID (so not just anyone can attend the meeting) and will also allow the the client to gather any required information from their viewers.
There are two ways of creating your registration form, the first is to clone the webform (this is the recommended method), and the second is to make it from scratch (this isn't recommended unless you know what you're doing).
IMPORTANT!
When creating your registration form (either via cloning an existing one or creating a new one) you must make sure the EMAIL and COMPANY form keys are always 'email' and 'company'. You can always change the label, but the form key MUST remain as mentioned otherwise viewing data cannot be recorded against the appropriate user.
Note
We will be focusing on Cloning an existing webform in this guide as it is the recommended method.
Cloning an existing webform
Please make sure you are signed in to the administration section of the website.
- On the top menu, click Content.
- When this screen has loaded for you, filter for Type, and select Webform.
- Find the AGM registration form you want to duplicate from and click the clone option next to it. For your initial events I recommend the 'CUSTOM AGM REGISTRATION MASTER' as this includes the basic registration form elements all preconfigured, so should minimise the need to make edits.
- This will take you to the edit screen of this Webform with all the details in place for your form, you now need to rename it (the system will simply call it ‘clone of Original_Name’). We recommend naming the Webform something clear and maybe include the date of the meeting as well to make is easier to find and recognise at a later date.
- Ensure the Webform is being published to 'Asset TV Live'.
- Then make sure the Publishing Options are set to Published.
- Finally hit Save.
- Now this is done, you need to edit the Meeting ID so each meeting doesn't have the same one. To do that you need to edit the form you've just created.
- Then open the Webform fields for this form by selecting the Webform tab.
-
This next screen will display the existing registration form fields with options to edit.
IMPORTANT!
We don't recommend removing the Name and Email fields otherwise we will not have any way to see who has logged in to the event
-
You need to edit the Meeting ID field, then click Form validation, and click edit at the bottom on the window
- On the screen you should see a field named (Key) Value which is where you need to change the Meeting ID - this is what users will need to type in to access the event.
- Now you need to click Save Rule to apply the update. If you need to edit the other fields for the registration form (add, remove or reorder them), then this'll also be the time to do that and save any additional changes you make.
Creating the questions/poll form
This second Webform is to allow users to answer questions related to the AGM or vote on matters arising during the AGM.
This process is very similar to the creating the registration form, except you will need to make changes for the questions being answered.
- On the top menu, click Content.
- When this screen has loaded for you, filter for Type, and select Webform.
- Find the AGM questions form you'd like to duplicate from and click the clone option next to it. For your initial events we recommend the 'CUSTOM AGM QUESTIONS MASTER' as this includes a basic setup you can flesh out.
- This will take you to the edit screen of this Webform with all the details in place for your form, you now need to rename it (the system will simply call it ‘clone of Original_Name’). We recommend naming the Webform something clear and short as this is what will appear as the tab title on the Live Video page.
- Ensure the Webform is being published to "Asset TV Live".
- Then make sure the Publishing Options are set to Published.
- Finally, hit Save.
- You may to edit questions the user has to answer. To do that you need to edit the form you've just created. You can find help on setting up webform questions in the How to create a webform guide
-
You will need add any questions that the user needs to answer during the AGM. You can separate them with one question per page (this is what we recommend to keep it looking clean and tidy), or have multiple questions per page.
IMPORTANT
Please make sure either replace the first question or edit it! And also do not remove the hidden fields as these allow you to see who submitted what.
-
If you decide to use dropdowns or radio buttons, please make sure the key for these fields are all lowercase, have no special characters, and use underscores for spaces.
- Once you're happy with your updates, this stage is completed and we move on to creating your Virtual AGM Event.
Creating your Virtual AGM Event / Registration page
The new Virtual AGM events are Custom Live events which have been upgraded with a new feature set to allow us to use the same system we already have. The biggest difference is the extra Webform for questions/polls and settings a Meeting ID for user validation.
- From the menu at the top in the admin panel go to: Content > Add Content > select Custom Event.
- This will open another create node form that will look similar to others such as videos and channels.
- Complete all the relevant fields, especially the Event Webform and Live Questionnaire Webform:
- Title - The title of the event and will be used as part of the final URL.
-
Event Webform - This is where you select the Registration Webform you created for the Virtual AGM event. The field will autocomplete once you start typing.
IMPORTANT
Do not use the same form on different events as the data collected will be collated into one list and there won't be a way to differentiate which user registered on which event page.
-
Live Questionnaire Webform - This will be the Questions Webform you created for the Virtual AGM event. The field will autocomplete once you start typing.
IMPORTANT
Do not use the same form on different events as the data collected will be collated into one list and there won't be a way to differentiate which user registered on which event page.
-
Logo - Allows you to upload the client’s logo to be used in the header of the event and registration pages.
- Event Date - Should be set as the broadcast date and time of the event. This will be used to create a countdown clock if users access the page before the event has started.
- Dial in Phone - Can be used to enter a phone number for the users to dial in and listen to the event. On the event page this will then appear in a pop up when users click the phone icon. If you leave the dial in details field blank the button will not appear on your event page.
- Main Colour - Sets the header background colour and the colour of the ‘Register’ button on the form. You can enter the hex code of your client’s desired colour when setting this.
- Domain Access Options - For these options, your event should be published to Asset TV Live or your event URL won’t be accessible.
- Header Banner - Allows you to upload a banner to appear at the top of the registration form.
- Video - This field can be used to place the player for the event. The field has been configured to allow any player be embedded using the full embed code supplied by the player provider. If this field contains anything it’ll be shown immediately allowing you to place holding slides closer to the time of the event. If a user is logged in while the field is empty, it’ll show a countdown timer and once the countdown has completed, it’ll refresh the page allowing anyone who open the page early to view the new video embed if they hadn’t already refreshed the page themselves.
- Description - Works the same way as normal Asset TV Live events or videos. The text entered will appear below the player and you can use HTML tags to style this as required.
- Enable Questions - This checkbox will switch on and off the Questions tab for the event, and allows a user to ask questions as the event is live. This is different to the questions/polls created in the second Webform earlier.
- Additional Resources - Works in the same way as the Description field by allowing you to enter text using HTML tags to style and create links. By entering text to this field an ‘Additional Resources’ tab will appear beneath the event player allowing you to place any links to external sites or supporting documentation in an easy to find place for users.
IMPORTANT
If you want the links to look like the example below, you'll need to format the Links like in the example above using the code snippet below.
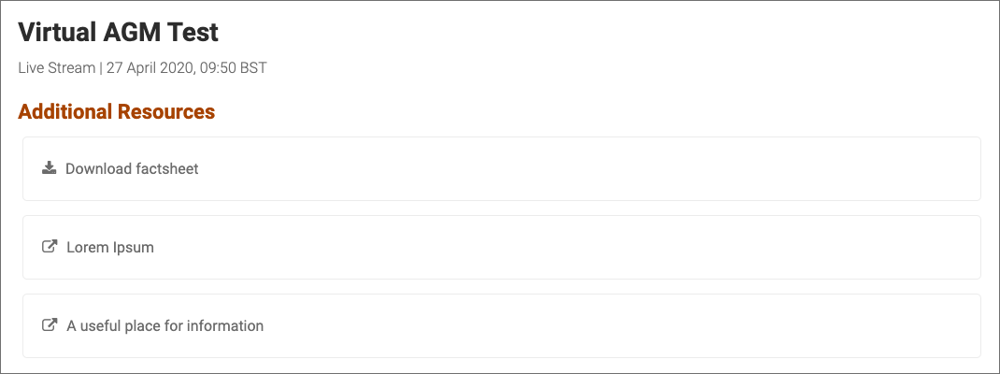
''' html A download link A link to somewhere else A link to another place '''
- Footer - Allows you to set the footer specific to your client and like the description field you can enter HTML tags to style this and add links if required.
- Welcome Email - Lets you set up text to be sent to the registrant as confirmation that they have registered successfully. If empty, they won't get a welcome email.
Getting the event URL
- Make sure you're logged in to the admin on live.asset.tv so the correct URL is available.
- Then go to Content from the main menu at the top of the page and filter for custom events.
- The Event title for your Event will be the URL and if you open it in a new window you'll have the URL.
Note
By accessing the URL in incognito (so you are not logged in with your admin account) you can check that the form and player display as intended so you can adjust any of the HTML tags or images you’ve used.
Admin tools before, during and after the event
To manage your event once you've created it, you should navigate to: Dashboard > Custom Events in Hydra/Titan.
On this page you will see a list of the Custom Events that have been created.
The options on this page will be useful at all stages of your event.
Before your Event
Before your event you can check and download a list of users who have registered by clicking on View or Download options under the Registrants column. This will list all the information they’ve been asked to complete on your Webform.
During your Event
During the event you can check the viewers who are logged in to your event.
Teleprompter
You can also administer the questions for the host of the show. The Admin view under Teleprompter will show you a list of questions submitted via the event page. This automatically refreshes every 10 seconds so questions come in as quickly as possible. If there are more questions that anticipated coming in and you need to pause the refresh feature briefly click on any of the questions. This will pause the feature until you click the question again to deselect it.
The View link for the questions does not require the user to have admin access to Hydra/Titan. This looks similar to the Admin view without the link to remove the question. This page refreshes every 60 seconds which gives the admin view the chance to filter questions appropriately for the event host (i.e. remove any technical questions viewers may have submitted)
Live Polling
You can also access live results to the polling/resolutions in one of 2 ways:
-
As an admin you can go to the Custom Events list (https://live.thevirtualagm.com/admin/dashboard/custom_events and then see links under the Survey Results section.
-
As a user as long as they’ve been given permission, they can access the polling/resolution results via https://live.thevirtualagm.com and there will be a link in the Live Polling column.
After your Event
After the event you can download a list of the viewers. This is a record of everyone who logged in during the event and can be used to upload MI and CPD/CE records to the system (N.B. if uploading MI, if users aren’t registered for ATV their views in the system will record them as anonymous).
The Teleprompter CSV allows you to download a complete record of questions submitted during the event (this will include any of the questions that were removed via the Admin screen during the event).
To get the list of responses for the Resolutions/Questions/Polls, you’ll need to:
- Go to the webforms list https://live.thevirtualagm.com/admin/content/webform
- Find the form you attached for these questions in the list and under the View column there are four option: Submissions; Analysis; Table; Download;
- Submissions - Lists everyone that submitted
- Analysis - Gives you a live update of the submissions as they are coming in
- Table - Shows a list all the user submissions for each question
- Download - Allows you to download all the user submissions